
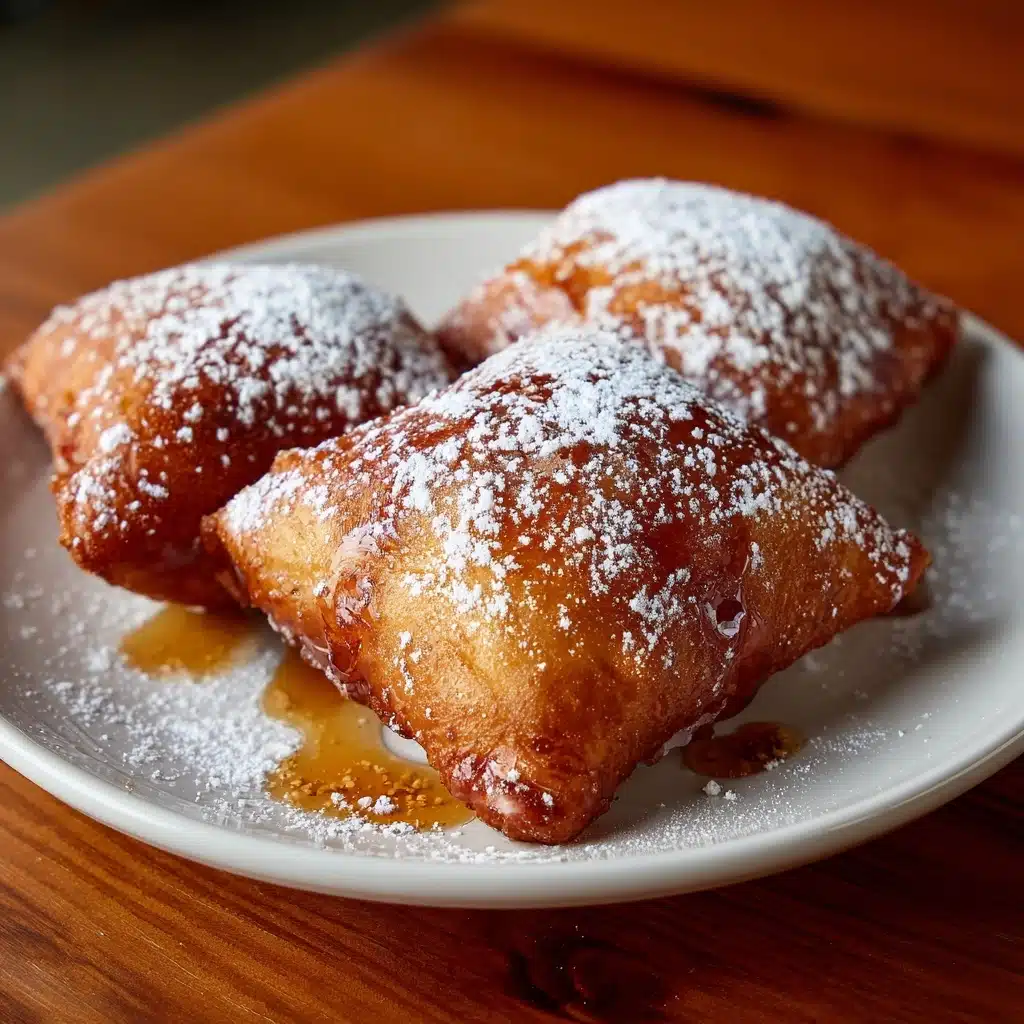
Authentic Sopaipillas Recipe
If you’re searching for a treat that’s as golden and inviting as a Southwestern sunset, look no further than this Authentic Sopaipillas Recipe. Imagine warm, airy pillows of fried dough dusted in sugar, cinnamon, and a generous drizzle of honey, perfect for tearing apart and sharing with the people you love. This timeless dessert is a crowd-pleaser at family gatherings, holiday feasts, or whenever you crave a sweet bite of comfort. Each crisp yet tender piece brings the flavors of tradition right into your kitchen, making this recipe a joyful addition to your collection.
Ingredients You’ll Need
This Authentic Sopaipillas Recipe comes together with humble pantry staples, but each ingredient plays a vital role in creating their signature lightness and delicate flavor. Let’s take a closer look at what makes these sopaipillas truly special.
- Flour: Provides the structure for the dough, resulting in puffed and airy sopaipillas every time.
- Baking powder: Gives the dough its beautiful lift and signature bubbles as it fries.
- Salt: Enhances flavor and balances the sweetness that comes later.
- Shortening: Lends tenderness to the dough and helps achieve the perfect, flaky texture.
- Hot water: Makes the dough pliable while helping to melt and distribute the shortening evenly.
- Vegetable oil: Used for frying the sopaipillas to a golden, crispy finish.
- Confectioners sugar: Adds a cloud of sweetness that clings to the warm dough.
- Ground cinnamon: Brings a cozy warmth and irresistible aroma.
- Honey: The classic drizzle that ties all the flavors together with gooey sweetness.
How to Make Authentic Sopaipillas Recipe
Step 1: Mix Dry Ingredients
In a large mixing bowl, combine the flour, salt, and baking powder. Giving these ingredients an even mix ensures that every bite of your sopaipillas will have the perfect flavor and rise. This is the simple foundation for an Authentic Sopaipillas Recipe that tastes just like the ones you remember.
Step 2: Cut in Shortening
Add the shortening to your bowl, and use your fingertips to gently rub it into the flour mixture. You want the texture to resemble coarse crumbs. This step creates a flaky, tender crumb inside each golden triangle.
Step 3: Add Hot Water and Form Dough
Slowly pour in the hot water, mixing as you go. Use your hands to bring the dough together. Work it gently, adding water only as needed just until it forms a rough dough. The heat helps melt and incorporate the shortening more easily, ensuring a smooth dough that’s easy to knead.
Step 4: Knead Until Smooth
Turn the dough out onto a lightly floured surface. Knead the mixture for 4–5 minutes, until it’s silky-smooth and elastic. This bit of effort develops the gluten for just the right chew—an essential characteristic of an Authentic Sopaipillas Recipe.
Step 5: Rest the Dough
Shape the dough into a ball and return it to the bowl. Cover it with plastic wrap or a clean kitchen towel and let it rest for at least 20 minutes. This resting period makes the dough easier to roll out and ensures those iconic puffy sopaipillas.
Step 6: Divide and Shape
After resting, knead the dough lightly, then reshape it into a ball. Gently flatten it, then cut it into four equal wedges using a sharp knife or pastry cutter. This is the start of transforming your dough into the pillowy bites we all love.
Step 7: Heat the Oil
In a deep pot, heat the vegetable oil to 350ºF. Achieving the right temperature means your sopaipillas will puff up immediately and cook to a crisp, golden color without getting greasy.
Step 8: Roll and Cut
Roll each wedge of dough into a ball. Take one and roll it into a round disc, about 6 inches across and roughly 1/8 to 1/4 inch thick. Cut the disc into four triangles—these will be your individual sopaipillas. Keep the unused dough covered so it stays soft.
Step 9: Fry to Perfection
Carefully slide a few triangles into the hot oil, being sure not to crowd the pot. Watch as they magically puff up! When the bottoms turn golden, flip them over with a slotted spatula to crisp the other side. Each batch should take around 4–5 minutes.
Step 10: Drain and Dust
Remove your sopaipillas from the oil and let them rest on a plate lined with paper towels. While they’re still warm, dust with confectioners sugar and cinnamon, then drizzle generously with honey. This final touch transforms them into the sweet treat everyone craves!
How to Serve Authentic Sopaipillas Recipe

Garnishes
The beauty of this Authentic Sopaipillas Recipe is that you can get creative with toppings. The classic finish is a generous dusting of confectioners sugar and cinnamon, paired with a rich drizzle of honey. Add a pinch of extra cinnamon or even a splash of melted chocolate for a fun twist if you like.
Side Dishes
Sopaipillas shine at the end of a hearty New Mexican meal alongside a steaming mug of Mexican hot chocolate or café de olla. For an unforgettable feast, serve them after spicy enchiladas, carne adovada, or a satisfying bowl of green chile stew. Their sweetness balances out rich and savory flavors beautifully.
Creative Ways to Present
Want to surprise your guests? Stack the sopaipillas like a little tower, drizzle with extra honey, and scatter berries on top for a show-stopping dessert plate. Or, set up a dipping station with honey, chocolate sauce, and spiced caramel so everyone can try their favorite combos with this Authentic Sopaipillas Recipe.
Make Ahead and Storage
Storing Leftovers
If you find yourself with leftover sopaipillas (which is rare!), let them cool to room temperature before placing in an airtight container. They’ll stay fresh for up to two days at room temperature, but a quick warm-up brings back their signature texture.
Freezing
For extended storage, freeze cooked sopaipillas in a single layer on a baking sheet, then transfer to a zip-top freezer bag once they’re solid. This way, your Authentic Sopaipillas Recipe can be enjoyed any time a craving hits. They stay tasty for up to one month in the freezer.
Reheating
To restore that fresh-from-the-fryer magic, reheat your sopaipillas in a 350ºF oven for 5–8 minutes or pop them in an air fryer for a few minutes until hot and crisp. Avoid microwaving, as this can make them chewy instead of delightfully crisp.
FAQs
Can I use butter instead of shortening?
Yes, you can swap in unsalted butter for shortening in this Authentic Sopaipillas Recipe. The butter will lend a richer flavor, though the result might be slightly less fluffy—but still delicious!
What kind of oil is best for frying?
Neutral oils like vegetable, canola, or sunflower work best for this recipe, as they don’t impart extra flavor and can withstand high temperatures, ensuring a golden, crispy exterior on your sopaipillas.
Can I make the dough ahead?
Absolutely! Prepare the dough and let it rest in the fridge for up to 24 hours. Just bring it back to room temperature before rolling and frying for the fluffiest results in your Authentic Sopaipillas Recipe.
Why didn’t my sopaipillas puff up?
The oil might not have been hot enough—keep it right around 350ºF. Also, be sure to roll the dough evenly (not too thin!) and let it rest before shaping for pillowy, perfectly puffed sopaipillas every time.
Can I serve sopaipillas with savory fillings?
Why not! Slice them open and fill with shredded chicken, beans, cheese, or green chile for a fun savory twist. It’s another way this Authentic Sopaipillas Recipe proves its versatility!
Final Thoughts
I hope you’re as excited as I am to make this Authentic Sopaipillas Recipe a tradition in your home. Gather your loved ones, dust up your countertops, and get ready for warm, golden bites that taste as joyous as any celebration. Don’t wait—treat yourself to a batch today, and watch these delicious pillows disappear right off the plate!
Print
Authentic Sopaipillas Recipe
- Total Time: 50 minutes
- Yield: 12 sopapillas 1x
- Diet: Vegetarian
Description
Learn how to make authentic Sopaipillas at home with this easy-to-follow recipe. These delicious fried dough pastries are crispy on the outside and soft on the inside, making them a perfect treat for any occasion.
Ingredients
Dough:
- 2 cups flour
- 1 tsp. baking powder
- ¼ tsp. salt
- 2 tbsp. shortening
- ¾ cups hot water
For Frying & Serving:
- 2 cups vegetable oil
- For dusting & drizzling:
- ¼ cup confectioners sugar
- 1 tsp. ground cinnamon
- 4 tbsp. honey
Instructions
- In a large bowl, mix together the flour, salt, and baking powder. Add the shortening and integrate it well with the flour.
- Pour the hot water into the bowl, little by little. Work the dough with your fingers until a dough forms.
- Knead the dough for about 4-5 minutes until smooth. Place the dough back in the bowl.
- Cover the dough and let it rest for at least 20 minutes. Resting helps the gluten develop.
- Knead the dough again and form it into a ball. Cut it into 4 pieces.
- Pour oil into a pot and heat to 350ºF. Roll the dough into balls, flatten, and cut into triangles.
- Carefully fry the sopapillas until golden on both sides. Drain on paper towels.
- Dust with sugar and cinnamon, then drizzle with honey to serve.
Notes
- For an extra touch, serve with Piloncillo syrup.
- Ensure oil is at the right temperature for frying.
- Prep Time: 30 minutes
- Cook Time: 20 minutes
- Category: Dessert
- Method: Frying
- Cuisine: Mexican
Nutrition
- Serving Size: 1 sopapilla
- Calories: 180
- Sugar: 12g
- Sodium: 150mg
- Fat: 8g
- Saturated Fat: 1g
- Unsaturated Fat: 6g
- Trans Fat: 0g
- Carbohydrates: 24g
- Fiber: 1g
- Protein: 2g
- Cholesterol: 0mg
Keywords: authentic sopaipillas, sopaipillas recipe, Mexican dessert, fried dough pastries


