
Bakery Style Chocolate Cream Cheese Pie Recipe
Introduction
These bakery-style cookies are a decadent treat perfect for cozy nights at home. With a creamy chocolate filling and a crisp cookie crust, they’re easy to make and irresistibly delicious.

Ingredients
- 8 oz cream cheese, softened
- 3/4 cup powdered sugar
- 1/4 cup unsweetened cocoa powder
- 1 cup whipped cream
- 1 pre-made cookie crust (about 9 inches)
- Chocolate shavings, for topping
Instructions
- Step 1: In a large mixing bowl, beat the softened cream cheese with powdered sugar and cocoa powder until the mixture is completely smooth and uniform in color, ensuring there are no lumps.
- Step 2: Gently fold the whipped cream into the chocolate cream cheese mixture using a spatula, mixing carefully to keep the mixture light and airy.
- Step 3: Spoon the prepared chocolate filling into the pre-made cookie crust, spreading it evenly with a spatula to fill the crust completely.
- Step 4: Place the assembled dessert in the refrigerator and chill for at least 3 hours or until the filling is firm and set.
- Step 5: Before serving, top the chilled dessert with chocolate shavings for an elegant finish. Serve cold and enjoy.
Tips & Variations
- For extra richness, try using mascarpone cheese instead of cream cheese.
- Use dark chocolate shavings for a more intense chocolate flavor.
- Serve with fresh berries for a refreshing contrast.
- If you prefer a firmer filling, add a teaspoon of gelatin dissolved in warm water to the mixture before folding in the whipped cream.
Storage
Store the dessert covered in the refrigerator for up to 3 days. To serve, let it sit at room temperature for 10 minutes for a softer texture. Avoid freezing, as the texture may change.
How to Serve

Serve this delicious recipe with your favorite sides.
FAQs
Can I make this dessert ahead of time?
Yes, it’s best made at least 3 hours ahead to allow the filling to set properly. You can prepare it the day before and keep it refrigerated.
Can I use a homemade cookie crust instead of store-bought?
Absolutely. A homemade cookie crust adds a personal touch and can be adapted to your favorite cookie recipe. Just make sure it fits an approximately 9-inch pan.
Print
Bakery Style Chocolate Cream Cheese Pie Recipe
- Total Time: 3 hours 15 minutes
- Yield: 8 servings 1x
- Diet: Vegetarian
Description
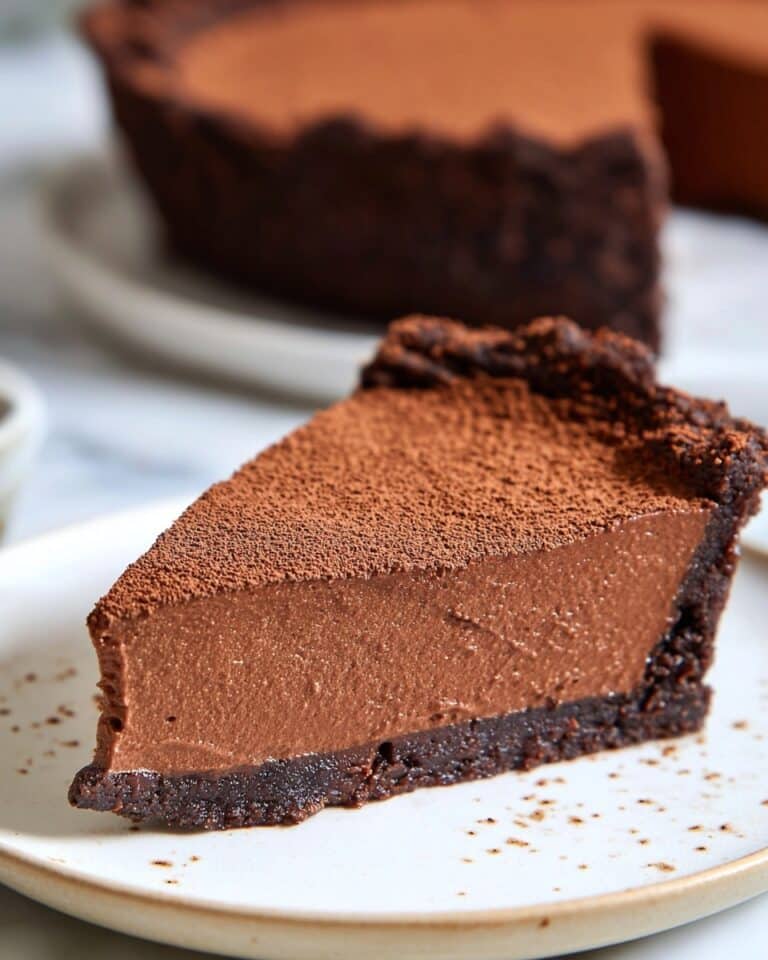
This Bakery Style Cookies dessert is a luscious, no-bake treat featuring a smooth chocolate cream cheese filling layered inside a pre-made cookie crust. Perfect for cozy nights, this dessert combines the richness of cream cheese and cocoa with the lightness of whipped cream, all topped with elegant chocolate shavings. It requires minimal prep and chilling time, making it an easy yet indulgent dessert to impress guests or enjoy as a comforting snack.
Ingredients
Filling
- 8 oz cream cheese, softened
- 3/4 cup powdered sugar
- 1/4 cup unsweetened cocoa powder
- 1 cup whipped cream
Crust & Topping
- 1 pre-made cookie crust (about 9 inches)
- Chocolate shavings, for topping
Instructions
- Prepare the filling: In a large mixing bowl, beat the softened cream cheese with powdered sugar and unsweetened cocoa powder until the mixture is completely smooth and uniform in color, ensuring there are no lumps.
- Fold in whipped cream: Gently fold the whipped cream into the chocolate cream cheese mixture using a spatula, mixing carefully to keep the mixture light and airy without deflating the whipped cream.
- Fill the crust: Spoon the prepared chocolate filling into the pre-made cookie crust, spreading it evenly with a spatula to fill the crust completely, ensuring a smooth and level surface.
- Chill the dessert: Place the assembled dessert in the refrigerator and chill for at least 3 hours or until the filling is firm and set, allowing the flavors to meld and the texture to firm up.
- Garnish and serve: Before serving, top the chilled dessert with chocolate shavings for an elegant finish. Serve cold and enjoy the rich, creamy texture balanced by the crisp cookie crust.
Notes
- Ensure the cream cheese is fully softened before mixing to avoid lumps.
- For best results, use freshly whipped cream or whipped cream from a chilled canister.
- The cookie crust can be homemade or store-bought for convenience.
- Keep the dessert refrigerated until just before serving to maintain its firmness and freshness.
- Chocolate shavings can be substituted with cocoa powder dusting or chocolate chips if preferred.
- Prep Time: 15 minutes
- Cook Time: 0 minutes
- Category: Dessert
- Method: No-Cook
- Cuisine: American
Keywords: chocolate cream cheese dessert, no bake dessert, cookie crust dessert, holiday cookies, chilled chocolate dessert, easy dessert recipes


