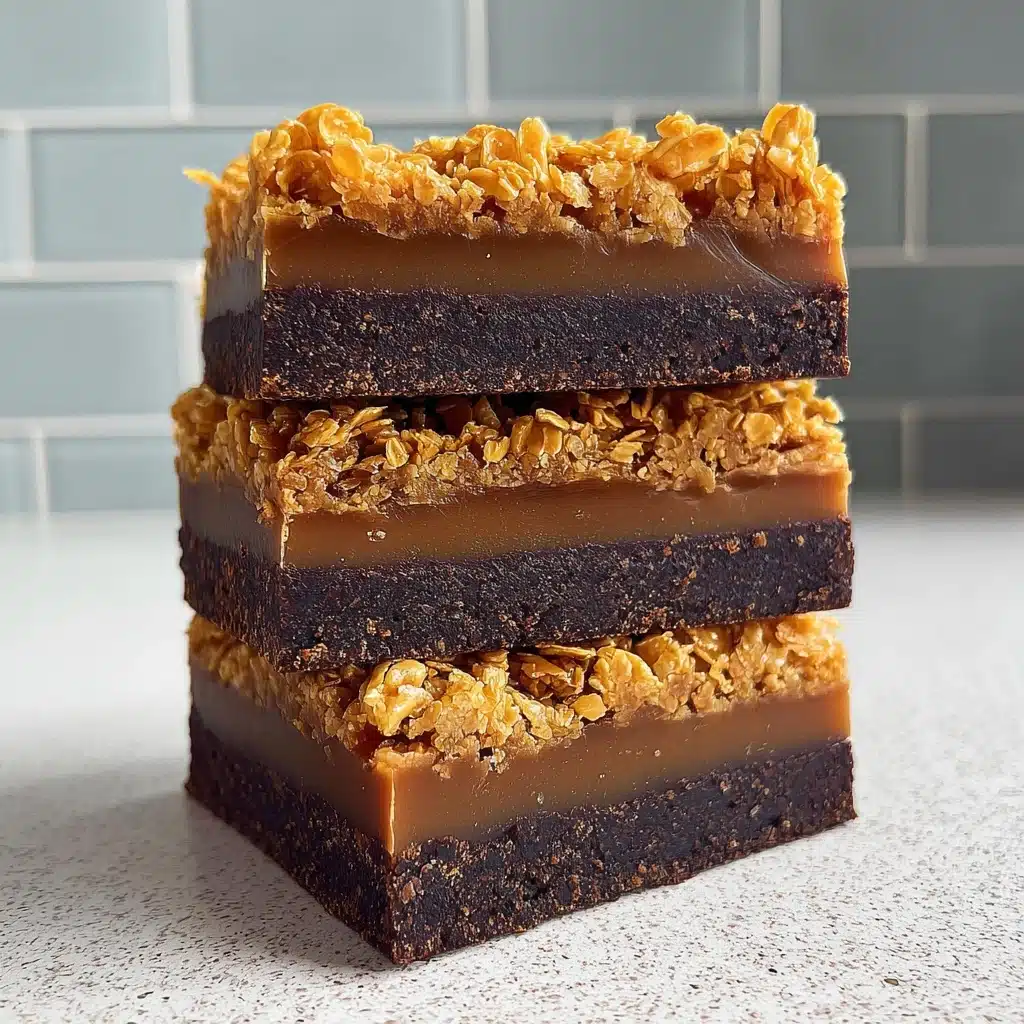
Cornflake Brownies Recipe
If you crave the ultimate marriage of fudgy richness and addictive crunch, Cornflake Brownies are about to become your new kitchen obsession. Imagine a deeply chocolatey, melt-in-your-mouth brownie base topped with a thick layer of buttery, salted caramel-coated cornflakes. Every bite hits you with an intense chocolate flavor and that irresistible snap and chew from the cornflake topping. This recipe is both nostalgic and wildly indulgent, striking the perfect balance between chewy, gooey, and crisp. Whether for a casual get-together or a show-stopping dessert at home, Cornflake Brownies absolutely steal the spotlight.
Ingredients You’ll Need
Ingredients You’ll Need
What makes Cornflake Brownies so unforgettable is just how a handful of kitchen staples transform into something utterly magical. Each ingredient serves a specific role, from the deep flavor of dark chocolate to the salty-sweet caramel that coats every flake.
- Unsalted butter (225g for brownies, 150g for topping): Adds richness to the brownies and makes the caramel coating for the cornflakes silky and indulgent.
- Dark chocolate (140g): Deep, bittersweet chocolate makes the brownies extra decadent.
- Eggs (5): Give the brownies structure and that luscious, fudgy interior.
- Brown sugar (180g): Brings subtle caramel depth and chewy texture to the brownie base.
- Granulated sugar (180g for brownies, 480g for topping): Sweetens both layers and helps achieve that shiny, crackly brownie top and crisp caramel on the cornflakes.
- Plain flour (100g): The structural backbone of the brownies, keeping them perfectly tender.
- Cocoa powder (50g): Intensifies the chocolate taste and gives a boost of color.
- Salt (1/4 tsp for brownies + 1 tsp for topping): Balances the sweetness and amplifies chocolate and caramel notes.
- Double cream (300ml): Creates a smooth, luxurious caramel that hugs every cornflake.
- Cornflakes (220g): The star of the show—these bring incredible crunch and a nostalgic twist to every bite.
How to Make Cornflake Brownies
Step 1: Prepare Your Pan and Oven
Start by heating your oven to 180°C/350°F. Grab a 9×12 inch cake tin, give it a generous greasing, and line it with parchment paper. This little bit of prep makes unmolding your Cornflake Brownies a breeze and helps achieve those perfectly neat edges we all love.
Step 2: Make the Brownie Batter
Place the butter and dark chocolate in a medium-sized pot, then set over a gentle medium heat. Stir continuously until it’s all smooth and glossy (or take a shortcut and melt them together in the microwave—just keep an eye out so nothing burns). Set aside and let it cool for a few minutes. In a large bowl, whisk the eggs with both sugars using an electric mixer or a sturdy whisk, until the mixture turns pale and fluffy, and has nearly doubled in volume. Pour in your melted butter-chocolate mixture, whisking to blend everything together.
Step 3: Fold in Dry Ingredients
Sift in the flour, cocoa powder, and salt right into your wet batter. Gently fold until just combined—don’t overmix! You’re aiming for a smooth, shiny batter with no dry pockets. Pour this into the lined tin, smoothing out the top.
Step 4: Bake the Brownies
Bake for 35–40 minutes, or until a toothpick poked into the center comes out with only a few moist crumbs. The smell will be unreal! Once done, rest the brownie base in the tin for about 10 minutes while you start on the crowning glory—the cornflake topping.
Step 5: Make the Caramel Cornflake Layer
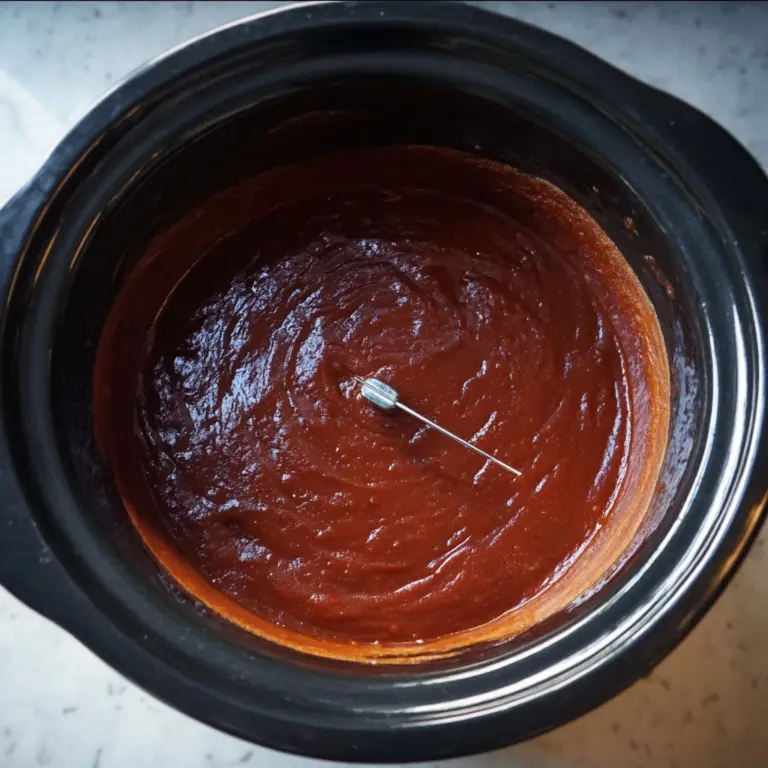
In a tall-sided, non-stick pot, add about a quarter of the granulated sugar. Set over medium heat, stirring constantly as it starts to melt. Gradually add the remaining sugar in quarters, stirring until each addition is mostly melted into a thick, amber-colored molten pool. This step tests your patience, but trust me—it’s worth it! Once all the sugar is a deep amber, pull the pot off the heat immediately. Carefully work in half the butter, whisking vigorously, then add the rest. As soon as it’s melted, slowly stream in your warm double cream, mixing continuously. Pop the pot back on the burner for a couple of minutes just to thicken the caramel, then stir in the salt followed by the cornflakes. Make sure every cornflake gets an even, glossy coat.
Step 6: Assemble and Set
Once your brownie base has cooled for about 10 minutes, spread the warm, sticky cornflake mixture right on top. Press down gently to create an even layer. Slide the pan into your fridge for at least 2 hours (overnight is even better!) to let everything firm up into sliceable squares of magic.
How to Serve Cornflake Brownies

Garnishes
Dress up your Cornflake Brownies with a flurry of flaky sea salt, a drizzle of melted chocolate, or a sprinkle of cocoa powder for a hint of drama and an extra pop of flavor. If you want them to look extra festive, a dusting of edible gold leaf or a few chocolate curls on top will absolutely wow your guests.
Side Dishes
Nothing beats a cold glass of milk or a scoop of vanilla ice cream alongside warm Cornflake Brownies. On cozy evenings, serve them with hot coffee or a velvety latte—perfect for balancing the sweet richness with something creamy. If you’re feeling playful, try pairing them with tart berries for a fresh, fruity contrast.
Creative Ways to Present
For a party-ready treat, slice Cornflake Brownies into bite-sized bars and stack them on a vibrant platter, or cut into triangles for a fun twist. If gifting, wrap individual pieces in parchment and tie with colorful string. For a dinner party finale, serve a warm square with a scoop of ice cream, a drizzle of caramel sauce, and a crunchy cornflake shard stuck on top like a crown.
Make Ahead and Storage
Storing Leftovers
Keep leftover Cornflake Brownies in an airtight container at cool room temperature for up to three days. The brownie base stays moist, and the cornflake layer keeps its crunchy bite—no one will believe they aren’t freshly made!
Freezing
To make them ahead or save some for a rainy day, freeze Cornflake Brownies (whole or sliced) wrapped tightly in plastic wrap and a layer of foil. They’ll keep their fantastic texture and taste for up to 2 months—just thaw at room temperature whenever the craving hits.
Reheating
If you love your Cornflake Brownies a little warm (and who doesn’t?), pop individual servings in the microwave for just 10–15 seconds. The brownies will get extra gooey, and the caramel fragrance will fill your kitchen all over again. Just be careful not to overheat, so the topping stays crispy.
FAQs
Can I use milk chocolate instead of dark chocolate in the brownies?
You can, though your Cornflake Brownies will turn out a bit sweeter and lighter in cocoa flavor. Dark chocolate really brings a deep, intense taste, but feel free to swap if you prefer a milder, creamier result.
Are Cornflake Brownies gluten-free?
They aren’t gluten-free as written, since plain flour is used in the base. However, you can substitute a 1:1 gluten-free baking blend for the flour, and ensure you use certified gluten-free cornflakes for a safe and delicious treat.
Can I make the caramel layer ahead of time?
It’s best to make the caramel cornflake layer just before assembling, since the caramel sets quickly and can become too stiff to spread if left to sit. If you do make it in advance, gently warm it until it’s spreadable before layering over the brownies.
What’s the secret to getting perfect, clean slices?
Use a large, sharp knife and run it under hot water, wiping clean and reheating the blade between slices. This helps cut neatly through both the gooey brownie and sticky cornflake layer for bakery-worthy presentation.
Can I add nuts or chocolate chips to the brownie layer?
Absolutely! A handful of toasted pecans, walnuts, or dark chocolate chips adds extra flavor and texture. Make sure to fold any additions in gently at the end, so your Cornflake Brownies remain perfectly dense and chewy.
Final Thoughts
There’s something marvelously nostalgic and outrageously delicious about Cornflake Brownies, and once you try them, you’ll want an excuse to bake a batch for every occasion. Don’t be surprised if these quickly rise to legendary status among your friends and family—give them a try, and enjoy every fudgy, crunchy, caramel-drizzled bite!