
Easy Onigiri Recipe (Japanese Rice Balls) Recipe
If you’ve ever wanted to dive into making something truly comforting and delicious from Japanese cuisine at home, this Easy Onigiri Recipe (Japanese Rice Balls) will become your new go-to. These delightful rice balls are packed with flavor from simple ingredients, effortlessly coming together to create a snack or meal that feels both nostalgic and fresh. Whether you’re looking for an easy lunch, a fun picnic snack, or a satisfying bite anytime, Onigiri brings a wonderful balance of texture, taste, and tradition right to your kitchen.
Ingredients You’ll Need
The beauty of this Easy Onigiri Recipe (Japanese Rice Balls) lies in its simplicity. Each ingredient plays an important role, from the perfectly cooked sushi rice providing the soft base to the aromatic furikake seasoning adding bursts of flavor and color. These essentials ensure your rice balls are as delicious as they are authentic.
- 2 cups dried sushi rice: The heart of Onigiri, sushi rice gives the sticky texture that holds everything together perfectly.
- 2 ½ cups water: Vital for cooking the rice just right, ensuring it’s fluffy yet sticky.
- 2 tablespoons furikake rice seasoning: A flavorful blend that adds umami, crunch, and a pop of color to every bite.
- 1 teaspoon salt: Enhances the natural flavor of the rice and balances the seasoning.
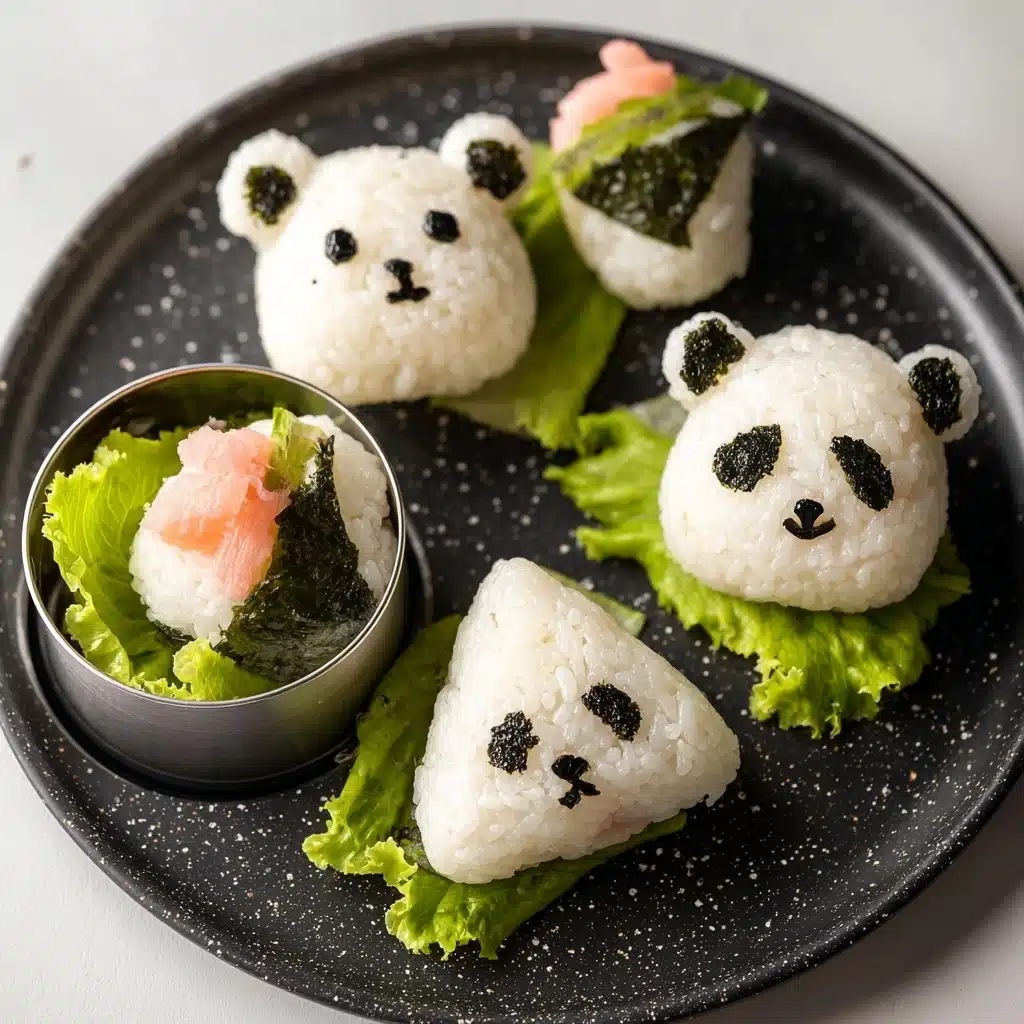
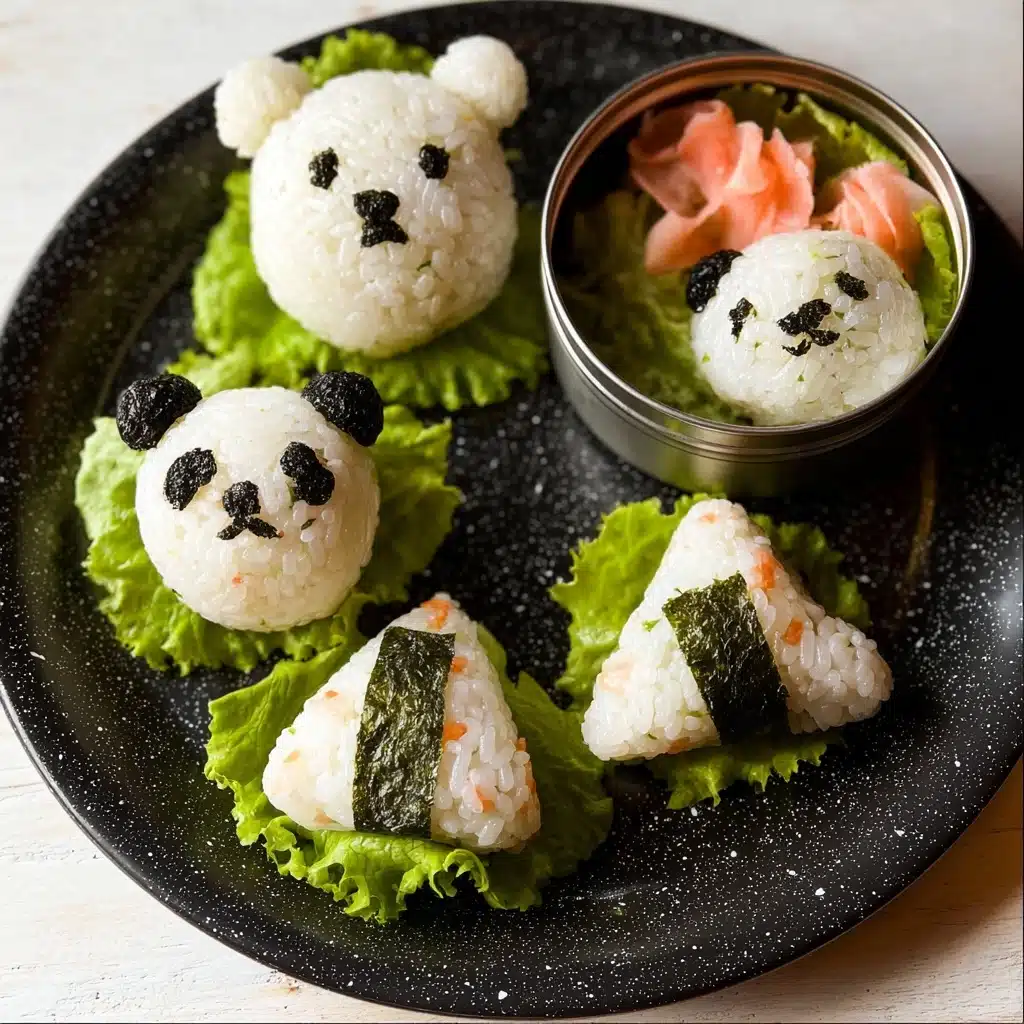
- Optional garnishes (Nori sheets, sushi ginger, sliced smoked salmon): These add visual appeal and extra layers of taste when you want to jazz up your Onigiri.
How to Make Easy Onigiri Recipe (Japanese Rice Balls)
Step 1: Rinse and Prep the Rice
Start by placing the rice in a medium saucepot and rinsing it thoroughly. This step is important to remove excess starch, which keeps the rice from becoming too gummy. Using a pot or bowl instead of a colander helps keep the grains intact and ready to cook perfectly sticky.
Step 2: Cook the Rice
Once rinsed, add 2 ½ cups of water to the pot and cover it. Bring it to a boil over high heat, then reduce to a low simmer for 15 minutes. After this, remove the pot from heat and let it steam for another 10 minutes without lifting the lid. This ensures the rice cooks evenly and stays wonderfully moist.
Step 3: Flavor the Rice
Fluff the cooked rice gently with a fork to separate the grains. Then mix in the furikake seasoning and salt. This is when your rice takes on its delicious personality, so mix carefully to avoid smashing the grains.
Step 4: Shape the Onigiri
Now comes the fun part! Using your hands or Onigiri molds, press the rice into your favorite shapes – balls, triangles, or ovals. If you’re using molds, a light spray of nonstick cooking spray helps prevent sticking. Make sure to press firmly enough to hold together but gently enough to keep the texture intact.
Step 5: Add Garnishes
Place each shaped rice ball onto parchment or wax paper. If you love adding that extra touch of flavor and style, decorate with strips of nori seaweed, sushi ginger, or smoked salmon slices for a professional look and taste.
Step 6: Chill or Serve
You can eat your Onigiri immediately or cover and refrigerate them until you’re ready to serve. Chilling lets the flavors meld, making these rice balls even more satisfying when enjoyed later.
How to Serve Easy Onigiri Recipe (Japanese Rice Balls)
Garnishes
Simple decorations like dark green nori sheets wrapped around the rice balls add an appealing texture contrast and a salty bite that perfectly complements the rice. Slices of pickled ginger or smoked salmon create a beautiful color pop and unique flavor that elevate your Onigiri into an elegant treat.
Side Dishes
Onigiri pairs wonderfully with light Japanese sides such as miso soup, a crisp cucumber salad, or pickled vegetables. These lighter accompaniments balance the richness and bring a freshness that rounds out your meal beautifully.
Creative Ways to Present
For a party or picnic, arrange your Onigiri on a platter with assorted colorful garnishes. Wrap individual rice balls with decorative nori cut-outs or serve them with dipping sauces like soy or wasabi mayo for an interactive eating experience. Presentation can be as fun and creative as you like!
Make Ahead and Storage
Storing Leftovers
If you have leftover Onigiri, store them in an airtight container in the refrigerator. Consuming within a day or two is best to enjoy their fresh taste and soft texture. Avoid leaving them out too long as rice spoils relatively quickly.
Freezing
Onigiri freezes well! Wrap each rice ball tightly in plastic wrap and place them in a freezer bag. When properly stored, they can last up to a month, letting you enjoy homemade Japanese comfort food even on busy days.
Reheating
To reheat, remove the plastic and microwave the Onigiri until warm, about 1-2 minutes depending on your microwave. You can also toast them lightly in a pan for a crispy exterior and warm, soft inside—delicious!
FAQs
Can I use regular rice instead of sushi rice?
While sushi rice is best due to its sticky texture, short-grain rice can work as a substitute. Just know the texture and stickiness might be different, which can affect the shape and feel of your Onigiri.
Do I have to add furikake seasoning?
Furikake adds great flavor and color, but you can skip it or substitute with other seasonings like toasted sesame seeds, salt, or even a bit of soy sauce for different variations.
How do I prevent the rice from sticking to my hands?
Wet your hands with a little water mixed with salt before shaping the rice. This prevents sticking and seasons the outside slightly, making forming Onigiri much easier.
Can I add fillings inside my Onigiri?
Absolutely! Popular fillings include pickled plum (umeboshi), tuna mayo, or cooked salmon. Simply put a small amount of filling in the center and mold the rice around it for a tasty surprise inside.
Is Onigiri suitable for kids?
Yes! Onigiri is kid-friendly, easy to hold, and customizable to fit picky eaters. You can make fun shapes and mild flavors to appeal to little hands and taste buds.
Final Thoughts
I hope you give this Easy Onigiri Recipe (Japanese Rice Balls) a try soon—making these rice balls at home is both fun and incredibly rewarding. With just a handful of ingredients and simple steps, you can create a taste of Japan that’s comforting, versatile, and utterly delicious. Sharing these with friends or family is the best way to spread the joy of homemade Japanese cooking!
Print
Easy Onigiri Recipe (Japanese Rice Balls) Recipe
- Total Time: 35 minutes
- Yield: 6 to 8 Onigiri rice balls 1x
- Diet: Gluten Free
Description
This easy onigiri recipe guides you to make classic Japanese rice balls using sushi rice seasoned with furikake and salt. Perfect as a portable snack or lunch item, these flavorful rice balls can be shaped by hand or using molds and garnished with nori, sushi ginger, or smoked salmon for added taste and presentation.
Ingredients
Main Ingredients
- 2 cups dried sushi rice
- 2 ½ cups water
- 2 tablespoons furikake rice seasoning
- 1 teaspoon salt
Optional Garnishes
- Nori sheets for decoration
- Sliced sushi ginger
- Sliced smoked salmon
Instructions
- Rinse the Rice: Place the rice in a medium saucepot. Rinse the rice several times by pouring off the water and excess starches. It’s best to rinse in a bowl or pot rather than a colander to avoid breaking the grains.
- Cook the Rice: Add 2 ½ cups of water to the pot with the rinsed rice and cover. Bring to a boil over high heat, then reduce the heat to low and simmer for 15 minutes. After cooking, remove the pot from heat and let it sit, covered, to steam for an additional 10 minutes.
- Season the Rice: Fluff the cooked rice gently with a fork to separate grains. Mix in the furikake rice seasoning and salt evenly for flavor.
- Shape the Onigiri: Using hands or Onigiri molds (sprayed lightly with nonstick cooking spray if needed), press the seasoned rice into balls or desired shapes. Be gentle to maintain the rice texture.
- Prepare for Serving: Place the shaped Onigiri on parchment or wax paper to prevent sticking.
- Garnish and Store: If desired, cut nori sheets into strips or shapes and press them onto the rice balls for decoration. You may also add slices of sushi ginger or smoked salmon. Cover the Onigiri and refrigerate until ready to serve.
Notes
- Use short-grain sushi rice for the best sticky texture that holds shape.
- Rinsing the rice thoroughly prevents it from becoming too gummy.
- Do not skip the resting/steaming step after boiling to ensure fluffy rice.
- If shaping by hand, wet your hands lightly with water to prevent rice from sticking.
- Onigiri molds are optional but helpful for uniform shapes.
- For vegan or vegetarian options, omit smoked salmon and use only nori and vegetable garnishes.
- Store Onigiri in the refrigerator and consume within 24 hours for best freshness.
- Prep Time: 10 minutes
- Cook Time: 25 minutes
- Category: Snack, Lunch
- Method: Boiling, Shaping
- Cuisine: Japanese
Nutrition
- Serving Size: 1 Onigiri (approx. 90g)
- Calories: 165
- Sugar: 1g
- Sodium: 220mg
- Fat: 1g
- Saturated Fat: 0g
- Unsaturated Fat: 1g
- Trans Fat: 0g
- Carbohydrates: 36g
- Fiber: 1g
- Protein: 3g
- Cholesterol: 0mg
Keywords: Onigiri, Japanese rice balls, sushi rice recipe, easy Japanese snack, furikake rice balls


