
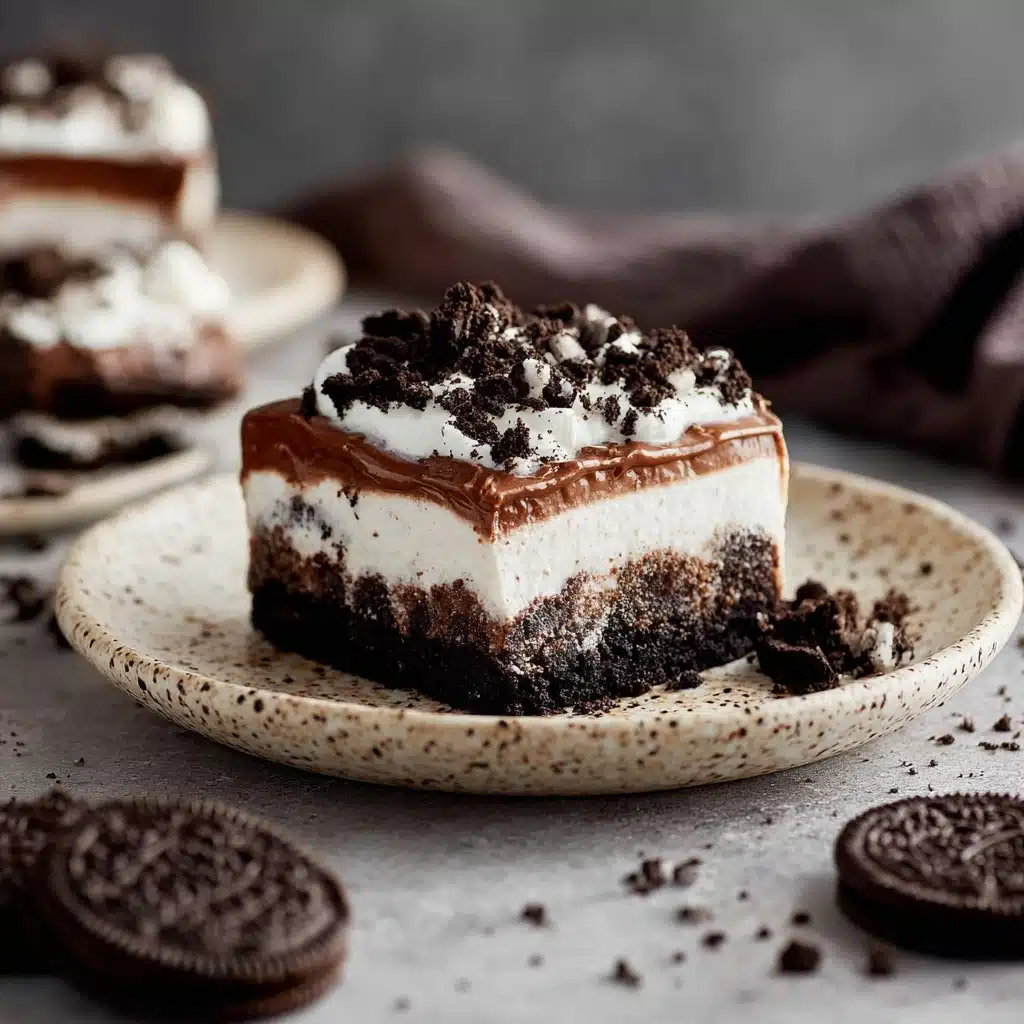
No-Bake Oreo Dessert Recipe
Imagine a dessert that delivers all the rich, chocolatey Oreo flavor you crave, but without ever having to turn on the oven—meet the No-Bake Oreo Dessert! This dish comes together with just a handful of ingredients and layers of creamy, dreamy goodness. Each forkful is a celebration: crunchy Oreo crust, smooth and tangy cream cheese, silky pudding, and fluffy whipped topping, crowned with even more cookies. Whether you’re heading to a potluck, celebrating a birthday, or just craving something decadent for movie night, this showstopper will win everyone over and have them begging for seconds.

Ingredients You’ll Need
The beauty of the No-Bake Oreo Dessert lies in its simplicity—each ingredient brings something unique, transforming everyday staples into a rich, crowd-pleasing masterpiece. Be sure to use the freshest possible items for the best results!
- Oreo Cookies (40): The foundation of the dessert offering a chocolatey crunch in every bite; regular or Double Stuf both work great.
- Unsalted Butter (1/2 cup, melted): Binds together the Oreo crumbs for a buttery, melt-in-your-mouth crust.
- Cream Cheese (8 oz, softened): Adds a rich, tangy layer that balances the sweetness and gives luxurious creaminess.
- Powdered Sugar (1 cup): Sweetens the cream cheese layer without making it grainy or overpowering.
- Cool Whip (16 oz, divided): Delivers the signature light, fluffy texture in two decadent layers; don’t substitute with whipped cream for best results.
- Instant Chocolate Pudding Mix (2 packs, 3.9 oz each): Provides a deep chocolate flavor and silky smoothness, setting up perfectly for slicing.
- Cold Milk (3¼ cups): Brings the pudding to life and helps it set; any milk from 1% to whole is perfectly fine.
How to Make No-Bake Oreo Dessert
Step 1: Prepare the Oreo Crust
Start by crushing all 40 Oreo cookies—the more rustic, the better! You can blitz them in a food processor for speed, but smashing them in a Ziploc bag with a rolling pin doubles as stress relief and gives you satisfying little cookie chunks. Reserve about 1/4 cup of crumbly Oreos to save for the topping. Mix the rest of the crumbs with melted butter in a bowl, stirring until every piece gleams. Pour the mixture into a 13×9-inch pan and press firmly with your fingers or the back of a spoon to form an even, compact crust. Slide the pan into the fridge while you move on to the next layer—chilling helps the crust hold together.
Step 2: Mix the Cream Cheese Layer
In a medium bowl, beat softened cream cheese until it’s velvety and lump-free—if it’s still chilly, pop it in the microwave for 20-30 seconds to get it just right. Once smooth, blend in the powdered sugar, then gently fold in 8 ounces of Cool Whip using a spatula (not a mixer, so it stays fluffy!). The result is a creamy, slightly tangy layer that pairs beautifully with the Oreos. Spread this mixture over your chilled crust in an even layer, then return the pan to the refrigerator.
Step 3: Make the Chocolate Pudding Layer
Pour both packages of instant chocolate pudding mix into a large bowl and whisk in the cold milk for 2 minutes—it should thicken slightly as you whisk. Let it stand for 5 more minutes to reach that perfect, spoonable consistency. Carefully spread the pudding over the cream cheese layer—you want each layer to remain distinct for the best presentation (and eating experience).
Step 4: Add the Fluffy Topping
Spoon the remaining 8 ounces of Cool Whip over your chocolate pudding layer. Use a spatula or offset knife to get it smooth and pillowy—this is the final creamy crown that sets off all the layers beneath.
Step 5: Sprinkle with Oreo Magic
Remember those reserved Oreo crumbs? It’s their time to shine! Sprinkle them generously over the top, adding bursts of color and chocolatey crunch. Not only do they look inviting, but they announce loudly and clearly: this is seriously Oreo territory.
Step 6: Chill and Set
The hardest part—waiting! Cover the pan and refrigerate for at least 4 hours, or overnight if you can resist. This rest period lets the layers fully set so every slice comes out picture-perfect. Plus, the flavors meld together and become even more delicious over time.
How to Serve No-Bake Oreo Dessert
Garnishes
A generous sprinkle of extra Oreo crumbs makes every piece irresistible, but feel free to dress it up even more! Try a drizzle of chocolate sauce, a few mini chocolate chips, or a dollop of whipped cream. Fresh berries or a twist of orange zest can add a pop of color and brightness if you want to get fancy for a party.
Side Dishes
While No-Bake Oreo Dessert absolutely shines on its own, you can make dessert extra special with a scoop of vanilla ice cream or some fresh strawberries on the side. The tartness of berries gives a beautiful balance to the richness of the layers, and a hot cup of coffee or cold glass of milk is the classic pairing.
Creative Ways to Present
Turn this crowd-pleaser into adorable individual cups or jars for picnics and parties—just layer everything as you would in the pan for an Instagram-worthy dessert. You can also make mini versions in muffin tins for easy, portable servings, or use themed sprinkles for birthdays and holidays. However you display it, No-Bake Oreo Dessert always impresses!
Make Ahead and Storage
Storing Leftovers
Leftover No-Bake Oreo Dessert is a gift that keeps on giving! Simply cover the pan tightly with plastic wrap or foil and refrigerate. It will stay fresh for up to 4 days, with the layers holding their shape and the Oreos maintaining a subtle crunch.
Freezing
Yes, you can freeze No-Bake Oreo Dessert! Slice it into portions, wrap each in plastic wrap, and store in an airtight container. It freezes beautifully for up to a month—just thaw overnight in the refrigerator before serving. The texture may become slightly softer, but the flavor is still spot-on.
Reheating
There’s no need to reheat since this dessert is meant to be chilled. If you prefer a softer texture, leave your serving out at room temperature for about 15 minutes before eating. It’ll taste just as decadent without any heat required.
FAQs
Can I use homemade whipped cream instead of Cool Whip?
While homemade whipped cream is delicious, Cool Whip provides stability that helps the dessert hold its layers longer. If substituting, use stabilized whipped cream for the best results.
What size pan works best for this recipe?
A 13×9 inch pan offers the perfect balance of layer thickness and easy slicing. If you use a smaller pan, layers will be thicker, which is great for presentation, but you might not fit all the cream and pudding.
Does the No-Bake Oreo Dessert taste better after chilling overnight?
Absolutely! Chilling overnight allows all the layers to set and the flavors to mingle, making each bite even more luscious. If you’re short on time, four hours is the bare minimum, but overnight is worth the wait.
Can I use different flavored Oreos in this dessert?
Of course! Try Golden Oreos for a vanilla twist, or mix in flavored varieties like mint or peanut butter for a fun change. The key is to stick to crisp cookies so the crust has the ideal texture.
Is it possible to make No-Bake Oreo Dessert gluten free?
Yes, simply substitute gluten-free Oreo-style cookies—they work beautifully and will keep everyone at the table happy. Double check all other ingredient labels just to be sure.
Final Thoughts
If you’re looking for a foolproof, delightful dessert that comes together effortlessly and wows every time, the No-Bake Oreo Dessert is calling your name. Make it for loved ones or just yourself, and let each creamy, crunchy bite remind you how wonderful simple ingredients can be. Give it a try—you might just discover your new favorite treat!
Print
No-Bake Oreo Dessert Recipe
- Total Time: 4 hours 20 minutes
- Yield: 12 servings 1x
- Diet: Vegetarian
Description
Indulge in this luscious No-Bake Oreo Dessert that combines the irresistible flavors of Oreos, cream cheese, and pudding in every decadent bite. A perfect treat for any occasion!
Ingredients
Crust
- 40 Oreo cookies
- 1/2 cup unsalted butter, melted
Cream Cheese Layer
- 8 oz cream cheese, softened
- 1 cup powdered sugar
- 8 oz Cool Whip
Pudding Layer
- 2 3.9 oz packages instant chocolate pudding mix
- 3 1/4 cups cold milk (1%, 2%, or whole)
- 8 oz Cool Whip
Instructions
- Crust: Crush the Oreos, mix with melted butter, press into a dish, and refrigerate.
- Cream Cheese Layer: Beat cream cheese, mix with powdered sugar and Cool Whip, spread over crust, and chill.
- Pudding Layer: Mix pudding with milk, spread over cream cheese layer, top with Cool Whip and crushed Oreos.
- Chill for 4 hours or overnight before serving.
Notes
- You can use regular or double-stuffed Oreos for this recipe.
- Ensure cream cheese is softened for a smooth texture.
- Refrigerate the dessert for the best consistency.
- Prep Time: 20 minutes
- Cook Time: 0 minutes
- Category: Dessert
- Method: No-Bake
- Cuisine: American
Nutrition
- Serving Size: 1 slice
- Calories: 380
- Sugar: 28g
- Sodium: 420mg
- Fat: 21g
- Saturated Fat: 12g
- Unsaturated Fat: 8g
- Trans Fat: 0g
- Carbohydrates: 43g
- Fiber: 1g
- Protein: 5g
- Cholesterol: 35mg
Keywords: No-Bake Oreo Dessert, Oreo dessert, no-bake dessert, easy dessert recipe

