
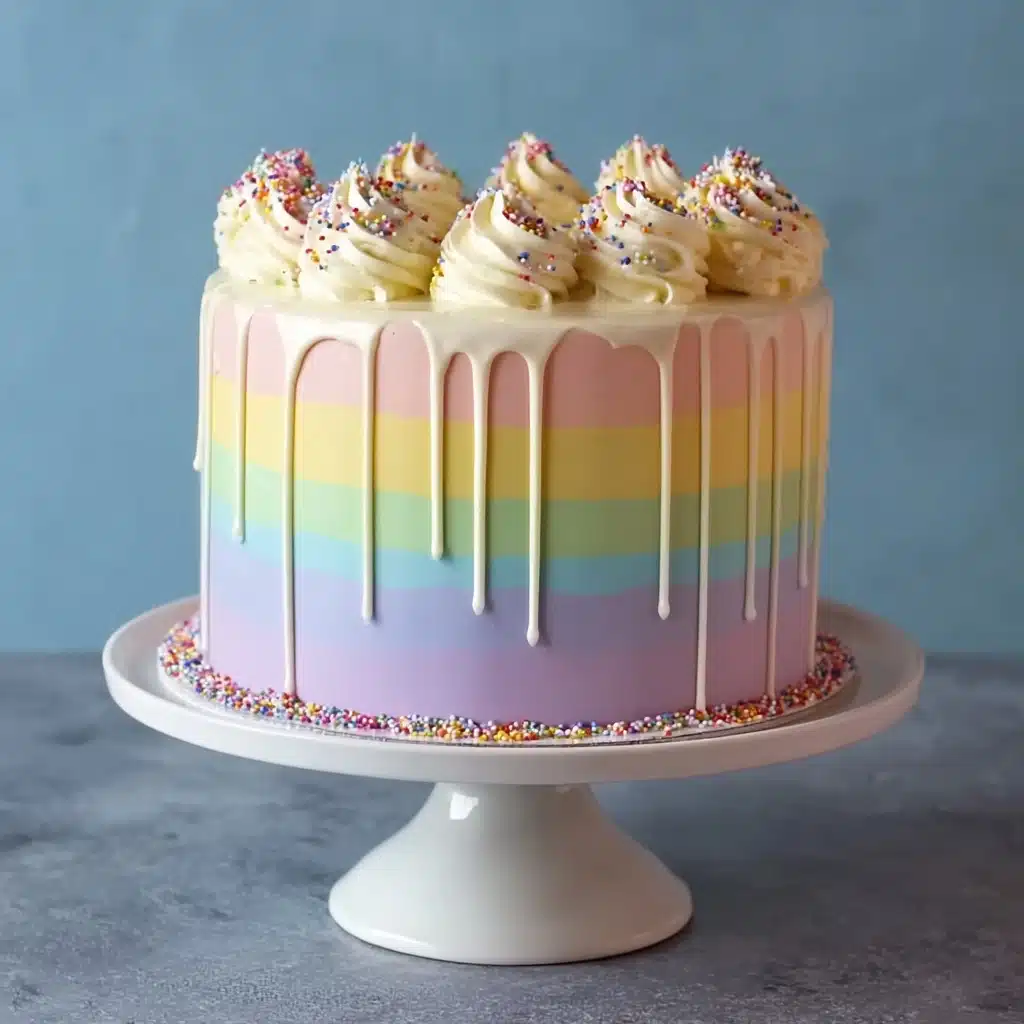
Rainbow Ombre Drip Layer Cake Recipe
If you are searching for a show-stopping dessert that combines vibrant colors with decadent flavors, look no further than the Rainbow Ombre Drip Layer Cake. This delightful cake layers fluffy, moist cake in a spectrum of colors, each perfectly tinted to create a stunning ombre effect. Topped with silky, tinted buttercream and a luscious white chocolate drip, this cake is as fun to make as it is delicious to eat. Whether you’re celebrating a special occasion or just want to brighten up your day, the Rainbow Ombre Drip Layer Cake is a guaranteed conversation starter and celebration centerpiece.

Ingredients You’ll Need
These ingredients are simple pantry staples transformed into a vibrant masterpiece. Each component plays an essential role, from the soft, tender crumb created by the all-purpose flour and butter, to the smooth, creamy buttercream that ties everything together with luscious sweetness and a hint of vanilla. The gel food coloring adds that magical pop of color that makes this cake truly special.
- 2 ½ cups all-purpose flour: Provides the structure and softness that makes the cake layers tender yet sturdy enough for stacking.
- 2 cups granulated sugar: Sweetens the batter perfectly without overpowering the other flavors.
- 4 large eggs: Helps bind everything and adds richness and moisture to the cake.
- 1 cup unsalted butter, softened: Adds flavor and creates a tender crumb with a melt-in-your-mouth texture.
- 2 ½ teaspoons baking powder: Ensures your cake layers rise beautifully and stay light.
- 1 cup milk: Adds moisture and helps blend the ingredients smoothly.
- 1 tablespoon vanilla extract: Enhances the cake’s flavor with warm, aromatic notes.
- Gel food coloring (pink, yellow, purple, blue, green): For that vibrant, smooth rainbow ombre effect without compromising texture.
- ½ cup heavy cream (divided): Used in the buttercream and drip for a silky, rich finish.
- 1 ½ cups white chocolate, chopped: Melts into a smooth drip that adds indulgence and elegance.
- 4 cups powdered sugar: Creates the perfect sweet, fluffy buttercream frosting.
How to Make Rainbow Ombre Drip Layer Cake
Step 1: Prepare Your Cake Pans and Batter
Begin by preheating your oven to 350°F (175°C) and preparing your cake pans by greasing and lining them with parchment paper. This step ensures your colorful layers release effortlessly without crumbling. Then, in a large bowl, cream the softened butter and sugar until the mixture is light and fluffy. This process traps air, helping your cake layers rise beautifully. Add the eggs one at a time, mixing well after each addition, and then stir in the vanilla extract for that irresistible aroma.
Step 2: Combine Dry and Wet Ingredients
In a separate bowl, whisk together the flour and baking powder to evenly distribute the leavening agent. Then, alternate adding the dry ingredients and milk into your wet mixture. Mix gently just until combined to maintain a tender crumb and avoid overworking the batter.
Step 3: Color Your Batter
Divide your cake batter evenly into 3 or 4 bowls, depending on how many layers you want. Use gel food coloring to tint each bowl a different color, carefully mixing until each shade is vibrant and even. This step is where your Rainbow Ombre Drip Layer Cake really starts to come alive, so have fun playing with the colors!
Step 4: Bake and Cool
Pour each colored batter evenly into your prepared pans and bake them for 25 to 30 minutes. Test doneness by inserting a toothpick in the center; it should come out clean. Once baked, cool the cakes completely on wire racks so they’re ready for stacking and decorating without melting your buttercream.
Step 5: Make the Buttercream
While your cake layers cool, beat softened butter until it turns pale and creamy. Gradually add powdered sugar, ensuring it’s well incorporated before adding ½ cup heavy cream and vanilla extract. Continue to beat until your buttercream is fluffy and smooth. Divide the buttercream into bowls and tint each one to match your cake layers for that continuous ombre effect.
Step 6: Assemble and Chill
Level each cake layer with a serrated knife or cake leveler for neat, flat tops. Begin stacking by spreading a generous layer of matching tinted buttercream between each of the layers. Once your layers are stacked, apply a thin crumb coat to seal in any crumbs, then chill the entire cake for 20 minutes. This step makes the final frosting layer smoother and easier to apply.
Step 7: Frost and Create the Ombre Effect
Apply the remaining tinted buttercream in an ombre pattern, using a spatula to blend the colors seamlessly from one layer to the next. A bench scraper is perfect for smoothing the sides and top for a polished, professional look that truly highlights the Rainbow Ombre Drip Layer Cake’s stunning gradient colors.
Step 8: Prepare and Add the White Chocolate Drip
Melt the white chocolate gently with 2 to 3 tablespoons of heavy cream to create a glossy, pourable drip. Let the mixture cool slightly to avoid melting your buttercream, then carefully drip it over the edges using either a spoon or a squeeze bottle. This luscious white chocolate drip adds the perfect touch of elegance and sweetness to your cake.
Step 9: Decorate
Finish your masterpiece by decorating the top with buttercream swirls, sprinkles, or delicate edible flowers to make your Rainbow Ombre Drip Layer Cake truly unforgettable. These finishing touches elevate the cake’s presentation and invite everyone to dig in.
How to Serve Rainbow Ombre Drip Layer Cake
Garnishes
Garnishing your Rainbow Ombre Drip Layer Cake is a wonderful way to personalize the dessert and enhance its visual appeal. Fresh edible flowers such as violets or pansies bring a natural elegance that complements the pastel hues perfectly. Alternatively, sprinkles or edible glitter add a festive sparkle that’s sure to delight both kids and adults alike.
Side Dishes
This cake pairs beautifully with simple sides that balance its sweetness. Fresh berries like raspberries or strawberries add a tart contrast and vibrant freshness. A light scoop of vanilla bean ice cream or a dollop of whipped cream also works wonderfully, adding creamy textures alongside the cake’s rich buttercream.
Creative Ways to Present
For an extra wow factor, consider serving slices on colorful plates that echo the ombre theme or arranging mini rainbow cupcakes alongside each slice for a fun twist. You can also plate each slice with a drizzle of berry coulis or chocolate sauce to add flavor complexity and a splash of beautiful color.
Make Ahead and Storage
Storing Leftovers
Once your Rainbow Ombre Drip Layer Cake has been devoured partially, store any leftovers in an airtight container in the refrigerator. This will keep the cake moist and protect the buttercream from drying out. Properly stored, the cake stays fresh for up to 3 days and maintains its vibrant colors and softness.
Freezing
You can freeze this cake, but for best results, freeze it before adding the white chocolate drip. Wrap the frosted cake tightly in plastic wrap and foil to prevent freezer burn. When you’re ready to enjoy it, thaw the cake overnight in the refrigerator and add the drip fresh for the best texture and appearance.
Reheating
While this cake is best served chilled or at room temperature, if you want to warm a slice slightly, let it sit at room temperature for 15 minutes before enjoying. Avoid microwaving as that could melt the buttercream and alter the texture. The true joy of the Rainbow Ombre Drip Layer Cake is its cool, creamy layers melting in your mouth.
FAQs
Can I use regular liquid food coloring instead of gel?
Gel food coloring is recommended because it provides more vibrant colors without thinning the batter, but you can use liquid food coloring if that’s all you have. Just be cautious about adding too much liquid as it can affect the texture of your cake.
How many layers can I make for the Rainbow Ombre Drip Layer Cake?
You can make anywhere from 3 to 6 layers depending on how tall and colorful you want your cake. Just divide your batter and buttercream accordingly, and build up layers to achieve your desired effect.
What if I don’t have white chocolate for the drip?
If white chocolate isn’t available, you can substitute with white candy melts or even use flavored ganache. Just make sure to melt it smoothly with some heavy cream for that perfect drip consistency.
Can this cake be made dairy-free?
Yes! Use dairy-free butter alternatives and non-dairy milk like almond or oat milk, and replace heavy cream with coconut cream for both the buttercream and drip for a delicious dairy-free Rainbow Ombre Drip Layer Cake.
How can I prevent the cake colors from bleeding into each other?
Ensure your cake layers are completely cooled before assembling and applying buttercream. Chilling the cake after crumb coating also helps the frosting set properly, reducing the chance of colors blending unintentionally.
Final Thoughts
I cannot recommend enough giving the Rainbow Ombre Drip Layer Cake a try at your next celebration or whenever you want to create a joyful baking experience. It’s bright, beautiful, and loaded with delicious flavors that bring smiles to any table. Plus, the process is downright fun—coloring, stacking, and decorating your way to a stunning dessert will make you feel like a cake artist in no time. So grab your mixing bowls and unleash your creativity with this unforgettable cake!
Print
Rainbow Ombre Drip Layer Cake Recipe
- Total Time: 1 hour
- Yield: 12 servings 1x
- Diet: Vegetarian
Description
This Rainbow Ombre Drip Layer Cake is a visually stunning and delicious dessert featuring vibrant layers of pink, yellow, purple, blue, and green tinted cake, stacked with matching colored buttercream. The cake is finished with a smooth ombre buttercream exterior and a luscious white chocolate drip, decorated with swirls and sprinkles or edible flowers, perfect for celebrations and special occasions.
Ingredients
Cake Batter
- 2 ½ cups all-purpose flour
- 2 cups granulated sugar
- 4 large eggs
- 1 cup unsalted butter, softened
- 2 ½ teaspoons baking powder
- 1 cup milk
- 1 tablespoon vanilla extract
- Gel food coloring (pink, yellow, purple, blue, green)
Buttercream
- ½ cup heavy cream (divided, some for buttercream)
- 4 cups powdered sugar
- 1 cup unsalted butter, softened (for buttercream—added as standard proportion)
- 1 tablespoon vanilla extract
Drip
- 1 ½ cups white chocolate, chopped
- 2–3 tablespoons heavy cream (for drip)
Decoration
- Buttercream swirls (reserved from colored buttercream)
- Sprinkles or edible flowers
Instructions
- Preheat Oven: Preheat your oven to 350°F (175°C). Grease and line 3 or 4 round cake pans with parchment paper to prevent sticking.
- Cream Butter and Sugar: In a large bowl, cream the softened butter and granulated sugar together until the mixture is light and fluffy, about 3-5 minutes, to incorporate air for a tender cake.
- Add Eggs and Vanilla: Add eggs one at a time to the butter-sugar mixture, beating well after each addition. Then mix in the vanilla extract thoroughly.
- Combine Dry Ingredients: In a separate bowl, whisk together the all-purpose flour and baking powder to evenly distribute the leavening agent.
- Alternate Adding Dry and Wet Ingredients: Gradually add the flour mixture and milk alternately to the wet ingredients, starting and ending with the flour mixture. Mix just until combined to avoid overmixing, which can toughen the cake.
- Divide and Color Batter: Evenly divide the batter into 3 or 4 separate bowls. Use gel food coloring to tint each portion a different color: pink, yellow, purple, blue, and green, mixing well to achieve vibrant hues.
- Bake the Cake Layers: Pour each colored batter into the prepared cake pans. Bake for 25–30 minutes or until a toothpick inserted into the center comes out clean. Remove from oven and let cool completely on wire racks.
- Make Buttercream: Beat the softened butter until pale and creamy. Gradually add the powdered sugar and continue to beat. Mix in half of the heavy cream and the vanilla extract. Add more cream as needed to reach a fluffy consistency.
- Color Buttercream: Divide the buttercream into bowls matching the number of cake layers. Tint each buttercream portion with gel food coloring to match the respective cake layers.
- Assemble the Cake: Level each cake layer by trimming the domed tops for even stacking. Place the first layer on a cake board or plate. Spread a layer of matching colored buttercream evenly over the surface. Continue stacking remaining layers with buttercream between each.
- Crumb Coat and Chill: Apply a thin crumb coat of buttercream over the entire stacked cake to seal in crumbs. Chill the cake in the refrigerator for 20 minutes to set the crumb coat.
- Apply Ombre Buttercream: Spread the remaining tinted buttercream on the chilled cake, creating an ombre gradient effect using a spatula. Smooth the surface with a scraper for a polished finish.
- Prepare White Chocolate Drip: Melt the white chocolate gently in a double boiler or microwave in short bursts, stirring frequently. Stir in 2-3 tablespoons of heavy cream until smooth. Let the drip mixture cool slightly so it thickens but is still pourable.
- Apply Drip: Using a spoon or squeeze bottle, carefully drip the white chocolate ganache around the edges of the cake, allowing it to cascade down the sides naturally.
- Decorate: Finish by piping buttercream swirls on top and decorating with sprinkles or edible flowers as desired for a festive presentation.
Notes
- Use gel food coloring instead of liquid to prevent thinning the batter and buttercream.
- Ensure cake layers are completely cooled before applying buttercream to avoid melting.
- For an even smoother buttercream, sift powdered sugar before adding.
- White chocolate ganache consistency is important – too thin will run excessively, too thick won’t drip well.
- Leftover cake and buttercream can be stored separately in the refrigerator for up to 3 days.
- Prep Time: 30 minutes
- Cook Time: 30 minutes
- Category: Dessert, Cake
- Method: Baking
- Cuisine: American
Nutrition
- Serving Size: 1 slice (1/12 of cake)
- Calories: 450 kcal
- Sugar: 38 g
- Sodium: 150 mg
- Fat: 25 g
- Saturated Fat: 15 g
- Unsaturated Fat: 8 g
- Trans Fat: 0.5 g
- Carbohydrates: 55 g
- Fiber: 1 g
- Protein: 4 g
- Cholesterol: 90 mg
Keywords: Rainbow cake, Ombre cake, Layer cake, White chocolate drip, Buttercream frosting, Celebration cake


