
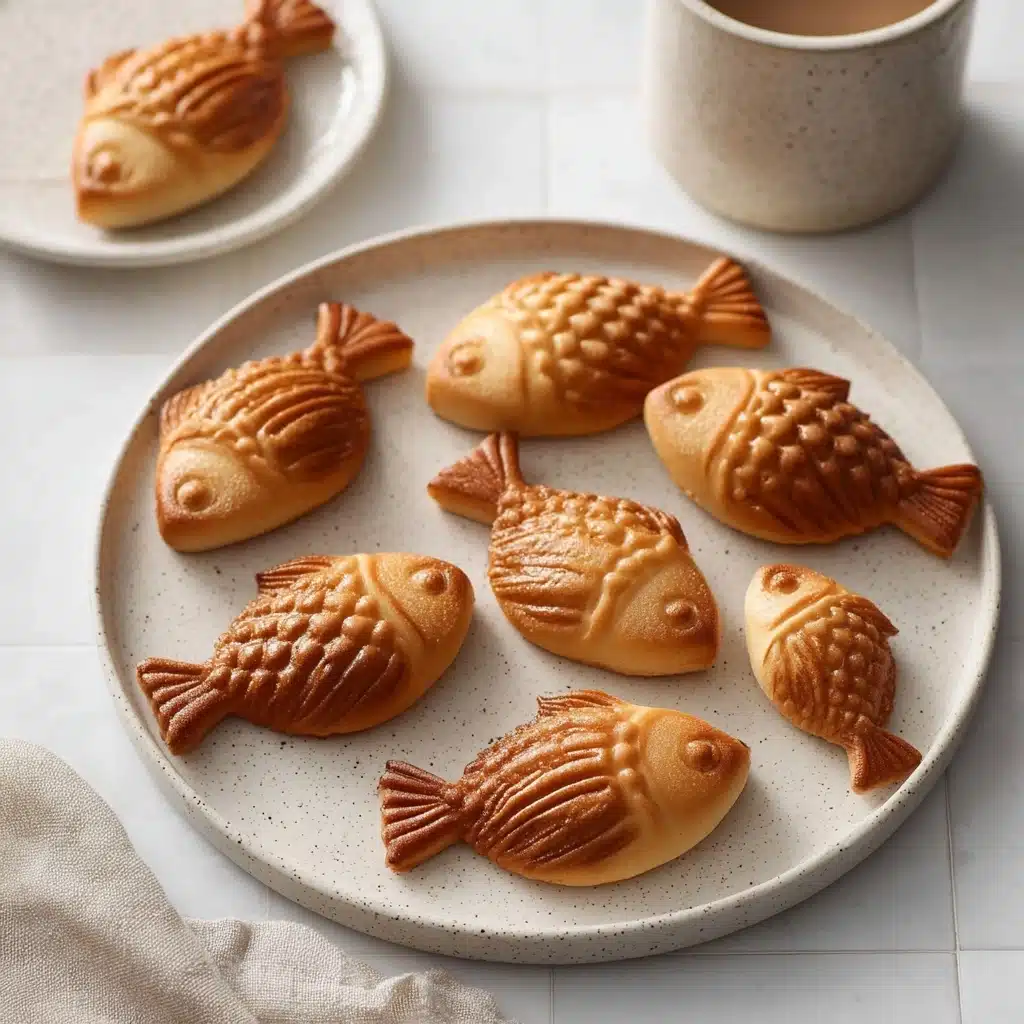
Taiyaki (Japanese Fish Dessert) Recipe
If you’ve been craving a treat that’s as fun to make as it is delicious to eat, you absolutely have to try Taiyaki (Japanese Fish Dessert). This charming fish-shaped cake, traditionally filled with sweet red bean paste but endlessly customizable, combines a perfectly fluffy, golden exterior with a warm, gooey center. It’s like catching a little bite of Japanese street food magic right in your own kitchen. Trust me, once you make this delightful Taiyaki (Japanese Fish Dessert), it’ll become one of your all-time favorite desserts to share with family and friends.
Ingredients You’ll Need
The beauty of making Taiyaki (Japanese Fish Dessert) is how simple, straightforward ingredients combine to create such a satisfying final result. Each component plays a key role, from the tender texture the cake flour provides to the subtle sweetness and fluffiness brought by the leavening agents and sugars.
- Cake flour (1 1/4 cup / 150 g): This light flour gives your Taiyaki a soft and airy crumb that’s just right for a dessert cake.
- Granulated sugar (1/4 cup / 50 g): Adds a gentle sweetness that balances beautifully with any filling.
- Baking powder (1 teaspoon / 5 g): Helps the batter rise, ensuring your Taiyaki is nice and fluffy.
- Baking soda (1 teaspoon / 5 g): Works with the baking powder to give a tender crumb and a slight crisp on the outside.
- Salt (1/4 teaspoon): Enhances flavor and balances the sweetness perfectly.
- Egg (1 large): Binds the ingredients and adds richness to the batter.
- Whole milk (3/4 cup): Moisturizes the batter and helps achieve that soft texture every perfect Taiyaki deserves.
- Vegetable oil (1 tablespoon / 15 g): Keeps the cake tender and prevents it from sticking to the mold.
- Vanilla extract (1/2 teaspoon): Adds a lovely aromatic warmth to the batter, lifting all the flavors.
- Filling (3/4 cup): Choose from traditional red bean paste or go creative with Nutella, custard, or cheese—whatever makes your Taiyaki uniquely yours!
How to Make Taiyaki (Japanese Fish Dessert)
Step 1: Prepare the Batter
Begin by sifting the dry ingredients: cake flour, sugar, baking powder, baking soda, and salt into a large bowl. Whisk them together thoroughly before setting them aside. In a separate medium bowl, combine the egg, milk, vegetable oil, and vanilla extract, whisking until smooth. Pour the wet ingredients into the dry and mix gently until just combined—don’t worry if there are a few lumps. Cover this batter and let it rest in the refrigerator for at least an hour to develop flavor and texture.
Step 2: Heat and Grease the Taiyaki Pan
Preheat your taiyaki pan over medium-low heat; this gentle warmth ensures even cooking without burning. Lightly brush both sides of the fish-shaped molds with neutral oil, then wipe off any extra with a paper towel to prevent sticking without an oily mess.
Step 3: Fill the Mold
Stir the rested batter briefly, then pour it into a measuring cup with a spout for easy pouring. Pour batter into each mold, filling it about 60% full so there’s room for your filling and the tail of the fish. Leave some space in the tail area empty for the final layer of batter.
Step 4: Add the Filling
Add roughly one tablespoon of your chosen filling right into the center of the batter. For cleaner application and ease, a piping bag works beautifully here, allowing you to precisely place the filling without spilling. This step is where the magic happens, transforming your Taiyaki into a sweet surprise.
Step 5: Seal and Cook
Cover the filling with a bit more batter to fill up the tail of the fish, then close the mold firmly. Flip the entire pan immediately to allow the batter to spread evenly and cook on both sides. Cook each side for about 2 to 3 minutes until the exterior turns a beautiful golden brown. Once ready, transfer your Taiyaki to a wire rack to cool slightly before serving. Snip away any excess batter with scissors for a clean finish. Continue with the remaining batter and filling, savoring the process as much as the end result!
How to Serve Taiyaki (Japanese Fish Dessert)

Garnishes
While Taiyaki (Japanese Fish Dessert) shines on its own, a light dusting of powdered sugar can add a lovely touch of elegance and sweetness. For a seasonal twist, sprinkle a bit of matcha powder, which adds beautiful color and that signature subtle bitterness balancing the sweet filling perfectly.
Side Dishes
Pair your Taiyaki with a steaming cup of green tea or fragrant hojicha to cut through the richness and enhance the overall flavor experience. A scoop of vanilla ice cream alongside warm Taiyaki turns this snack into a decadent dessert experience. For a playful contrast, fresh fruits like strawberries or kiwi provide refreshing brightness on the side.
Creative Ways to Present
Serving Taiyaki (Japanese Fish Dessert) as mini bites on skewers is fantastic for parties or sharing. You can also ice or glaze the exterior with chocolate or caramel sauces for an extra indulgent twist. Another fun idea is to experiment with savory fillings like cheese or custard, transforming the dessert into a versatile treat perfect any time of day.
Make Ahead and Storage
Storing Leftovers
If you have any Taiyaki leftovers, keep them in an airtight container at room temperature for up to one day. This helps maintain their crisp outer layer while keeping the filling deliciously soft inside. Just be sure to enjoy them relatively soon for the best texture and flavor.
Freezing
For longer storage, wrap each Taiyaki individually in plastic wrap, then place them in a freezer-safe bag or container. Frozen Taiyaki (Japanese Fish Dessert) can last for up to one month without losing much of their character. This is perfect for preparing batches ahead of time or saving treats for special occasions.
Reheating
To bring frozen or stored Taiyaki back to life, gently warm them in a toaster oven or pan over low heat until they regain their crispiness and warmth. Avoid microwaving directly as this can make the exterior soggy. Proper reheating preserves the irresistible contrast of crispy outside and gooey inside that makes Taiyaki so beloved.
FAQs
What fillings can I use for Taiyaki (Japanese Fish Dessert)?
Traditionally, sweetened red bean paste is the classic filling for Taiyaki, but you can get creative! Nutella, custard, cream cheese, chocolate, or even savory options like cheese and vegetables work wonderfully. The key is to choose fillings that hold their shape and taste great warm.
Do I need a special pan to make Taiyaki?
Yes, a taiyaki pan with fish-shaped molds is essential to get the iconic shape and proper cook on both sides. These pans come in electric or stovetop options and are relatively affordable, making your homemade Taiyaki authentic and fun to make.
Can I make the batter ahead of time?
Absolutely! Letting the batter rest in the refrigerator for at least one hour, or even overnight, improves its texture and flavor. Just make sure to give it a gentle stir before using it in the pan.
What if I don’t have cake flour?
If cake flour isn’t on hand, you can substitute it by removing 2 tablespoons of all-purpose flour per cup and replacing it with cornstarch. This mixture mimics the light texture of cake flour and works well for Taiyaki batter.
Is Taiyaki best eaten fresh or can I refrigerate it?
Taiyaki is definitely best enjoyed fresh and warm when the exterior is crisp and the filling is soft and molten. That said, it can be refrigerated and lightly reheated the next day, though the texture will be less crisp and a bit chewier.
Final Thoughts
There is something truly special about the joy of making and sharing Taiyaki (Japanese Fish Dessert). From the simple ingredients and straightforward steps to the irresistible fish shape and gooey filling inside, this recipe brings a bit of delight to any day. Whether you’re making it for a cozy night in or sharing with loved ones, I hope it finds a happy spot in your dessert rotation. Give it a try—you might just fall in love with Taiyaki all over again!
Print
Taiyaki (Japanese Fish Dessert) Recipe
- Total Time: 1 hour 35 minutes
- Yield: 6–8 taiyaki (depending on mold size) 1x
- Diet: Vegetarian
Description
Taiyaki is a traditional Japanese fish-shaped dessert made from a light and fluffy cake batter filled with sweet fillings like red bean paste, Nutella, custard, or cheese. Crisp on the outside and soft inside, this delightful treat is perfect for a snack or dessert and can be customized with your favorite filling.
Ingredients
Dry Ingredients
- 1 1/4 cup (150 g) cake flour
- 1/4 cup (50 g) granulated sugar
- 1 teaspoon (5 g) baking powder
- 1 teaspoon (5 g) baking soda
- 1/4 teaspoon salt
Wet Ingredients
- 1 large egg
- 3/4 cup whole milk
- 1 tablespoon (15 g) vegetable oil
- 1/2 teaspoon vanilla extract
Filling
- 3/4 cup filling (red bean paste, Nutella, custard, cheese, or other desired fillings)
Instructions
- Prepare the dry ingredients: Sift the cake flour, granulated sugar, baking powder, baking soda, and salt together into a large mixing bowl. Whisk them to combine thoroughly, then set aside.
- Combine the wet ingredients: In a separate medium bowl, whisk the egg, whole milk, vegetable oil, and vanilla extract until fully blended.
- Make the batter: Pour the wet ingredients into the bowl with dry ingredients. Whisk gently until just combined, leaving a few lumps for a tender texture. Cover and refrigerate the batter for at least 1 hour to rest.
- Preheat and prepare taiyaki pan: Heat a taiyaki pan over medium-low heat. Brush both sides of the mold with neutral oil and wipe off any excess oil with a paper towel to prevent sticking.
- Pour batter into mold: Stir the batter briefly and transfer it into a measuring cup with a spout for easy pouring. Pour the batter into each fish mold about 60% full, leaving space at the fishtail section empty for filling.
- Add filling: Place about 1 tablespoon of your desired filling (red bean paste, Nutella, custard, etc.) in the center of the batter in the mold. Using a piping bag helps with neat filling placement.
- Cover the filling: Pour additional batter over the filling, filling the fishtail section of the mold. Close the taiyaki mold and immediately flip it over to spread the batter evenly inside.
- Cook taiyaki: Cook for 2-3 minutes on each side or until both sides are golden brown and cooked through. Use scissors to trim any excess batter around the edges.
- Cool and serve: Transfer cooked taiyaki to a rack to cool slightly before serving. Best enjoyed warm. Repeat the process with remaining batter and filling.
Notes
- You can customize the filling to your liking — tried and true options include sweet red bean paste, chocolate spreads, custard, or cheese.
- Resting the batter in the refrigerator improves the texture, making it lighter and fluffier.
- If you don’t have a taiyaki pan, a similar fish-shaped mold or even a small waffle maker can work with adjustments.
- Brush oil lightly and wipe excess to prevent sticking but avoid too much oil to keep taiyaki crispy outside.
- Serve taiyaki warm for best texture and flavor; leftovers can be reheated gently but may lose crispness.
- Prep Time: 15 minutes
- Cook Time: 20 minutes
- Category: Dessert, Snack
- Method: Pan-frying
- Cuisine: Japanese
Nutrition
- Serving Size: 1 piece (approximately 80g)
- Calories: 190 kcal
- Sugar: 8 g
- Sodium: 120 mg
- Fat: 6 g
- Saturated Fat: 1 g
- Unsaturated Fat: 4 g
- Trans Fat: 0 g
- Carbohydrates: 30 g
- Fiber: 1 g
- Protein: 4 g
- Cholesterol: 35 mg
Keywords: Taiyaki, Japanese dessert, fish-shaped cake, red bean pastry, sweet snack


