
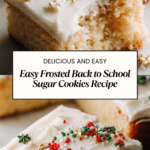
Perfect Frosted Back to School Sugar Cookies Recipe
Introduction
These Perfect Frosted Back to School Sugar Cookies are a delightful treat to celebrate the new school year. Soft, buttery cookies topped with creamy, colorful frosting make them fun for kids and adults alike. They’re easy to decorate and perfect for sharing.
Ingredients
- 2 ¾ cups (345g) all-purpose flour
- 1 teaspoon baking powder
- ½ teaspoon salt
- 1 cup (227g) unsalted butter, softened
- 1 ½ cups (300g) granulated sugar
- 1 large egg, room temperature
- 2 teaspoons pure vanilla extract
- Optional: 1 tablespoon whole milk
- 4 ounces (115g) cream cheese, softened
- ½ cup (113g) unsalted butter, softened
- 3 cups (360g) powdered sugar, sifted
- 1 teaspoon vanilla extract
- 1–2 tablespoons milk or heavy cream
- Food coloring gels
- Sprinkles, edible markers, and small piping tips for decoration
Instructions
- Step 1: In a medium bowl, whisk together the flour, baking powder, and salt.
- Step 2: In a large bowl, beat the softened butter and granulated sugar on medium speed until light and fluffy, about 3-4 minutes.
- Step 3: Beat in the egg and vanilla extract until just combined.
- Step 4: Gradually add the dry ingredients to the wet mixture, mixing on low speed until incorporated. If the dough feels dry, add the optional milk.
- Step 5: Wrap the dough in plastic wrap and chill in the refrigerator for 30 to 60 minutes.
- Step 6: Preheat the oven to 350°F (175°C) and line baking sheets with parchment paper or silicone mats.
- Step 7: On a floured surface, roll the dough to about ¼-inch thickness. Use themed cookie cutters to cut shapes and place them about 1 inch apart on the baking sheets.
- Step 8: Bake the cookies for 10-12 minutes, until the edges are slightly golden but the centers remain pale.
- Step 9: Let the cookies cool completely on wire racks before frosting.
- Step 10: To make the frosting, beat the cream cheese and butter until creamy. Gradually add the powdered sugar and vanilla extract, then add milk or heavy cream until the frosting reaches a spreadable consistency.
- Step 11: Divide and color the frosting with food coloring gels as desired. Decorate the cookies using piping bags, tips, sprinkles, or edible markers.
- Step 12: Allow the frosting to set for 1 hour before storing or packing the cookies.
Tips & Variations
- Chilling the dough helps the cookies hold their shape better during baking.
- Use gel food coloring for vibrant frosting without thinning the consistency.
- For a dairy-free version, substitute the cream cheese and butter with plant-based alternatives.
- Sprinkle sanding sugar on frosted cookies for extra sparkle and texture.
Storage
Store the frosted cookies in an airtight container at room temperature for up to 3 days. For longer storage, keep them refrigerated for up to a week. Let refrigerated cookies come to room temperature before serving for best texture. Frosted cookies can also be frozen for up to 2 months; thaw completely before enjoying.
How to Serve
Serve this delicious recipe with your favorite sides.
FAQs
Can I make the cookie dough ahead of time?
Yes, you can prepare the dough and chill it for up to 48 hours before baking. Just keep it tightly wrapped in plastic in the refrigerator.
How do I prevent the frosting from melting on the cookies?
Make sure the cookies are completely cooled before frosting. Use cream cheese frosting that is chilled before spreading and store the finished cookies in a cool place.
Print
Perfect Frosted Back to School Sugar Cookies Recipe
- Total Time: 1 hour 37 minutes
- Yield: 24 servings 1x
Description
These Perfect Frosted Back to School Sugar Cookies are soft, buttery, and lightly sweetened with a creamy vanilla frosting. Ideal for celebrating the new school season, the cookies are cut into fun shapes, baked until just golden at the edges, and decorated with colorful frosting and sprinkles. The recipe offers a classic sugar cookie base with a rich cream cheese frosting, perfect for kids and adults alike.
Ingredients
Dry Ingredients
- 2 ¾ cups (345g) all-purpose flour
- 1 teaspoon baking powder
- ½ teaspoon salt
Cookie Dough
- 1 cup (227g) unsalted butter, softened
- 1 ½ cups (300g) granulated sugar
- 1 large egg, room temperature
- 2 teaspoons pure vanilla extract
- Optional: 1 tablespoon whole milk
Frosting
- 4 ounces (115g) cream cheese, softened
- ½ cup (113g) unsalted butter, softened
- 3 cups (360g) powdered sugar, sifted
- 1 teaspoon vanilla extract
- 1–2 tablespoons milk or heavy cream
- Food coloring gels
- Sprinkles, edible markers, and small piping tips for decoration
Instructions
- Mix dry ingredients: In a medium bowl, whisk together the all-purpose flour, baking powder, and salt until fully combined and set aside.
- Cream butter and sugar: Using a mixer on medium speed, beat the softened unsalted butter and granulated sugar together until the mixture becomes light and fluffy, about 3 to 4 minutes.
- Add egg and vanilla: Add the room temperature egg and pure vanilla extract into the butter and sugar mixture, beating until just combined to maintain a tender dough.
- Combine dry and wet ingredients: Gradually add the dry flour mixture to the wet ingredients, mixing on low speed until fully incorporated. If the dough feels dry, add the optional tablespoon of whole milk to reach the right consistency.
- Chill dough: Wrap the dough tightly in plastic wrap and chill in the refrigerator for 30 to 60 minutes to firm up, which makes it easier to roll and cut.
- Preheat oven: Preheat your oven to 350°F (175°C) and line baking sheets with parchment paper or silicone baking mats to prevent sticking and allow even baking.
- Roll and cut dough: On a floured surface, roll the dough out to approximately ¼-inch thickness. Use themed cookie cutters to cut shapes, and place them about one inch apart on the prepared baking sheets.
- Bake cookies: Bake the cookies in the preheated oven for 10 to 12 minutes, until the edges are slightly golden but the centers remain pale to preserve softness.
- Cool cookies: Remove baked cookies from the oven and transfer them to wire racks to cool completely before decorating to avoid melting the frosting.
- Prepare frosting: In a mixing bowl, beat the softened cream cheese and butter together until smooth and creamy. Gradually add sifted powdered sugar and vanilla extract, continuing to beat. Then add milk or heavy cream one tablespoon at a time until the frosting reaches a smooth and spreadable consistency.
- Color and decorate: Divide frosting into portions and tint with desired food coloring gels. Use piping bags fitted with small tips, edible markers, and sprinkles to decorate the cooled cookies with festive back-to-school themes.
- Set frosting: Allow the decorated cookies to sit at room temperature for about 1 hour, letting the frosting set firmly before storing or packing for lunchboxes or parties.
Notes
- For softer cookies, avoid overbaking; remove them when edges just turn golden.
- Chilling dough helps prevent spreading and keeps cookie shapes intact.
- If dough is too sticky, chill longer or add a little extra flour during rolling.
- Use room temperature ingredients for best mixing and texture.
- Decorate with edible markers for personalized messages or small details after frosting sets.
- Store finished cookies in an airtight container at room temperature for up to 3 days or freeze for longer storage.
- Prep Time: 40 minutes
- Cook Time: 12 minutes
- Category: Dessert
- Method: Baking
- Cuisine: American
Keywords: sugar cookies, back to school cookies, frosted cookies, cream cheese frosting, decorated cookies, kid-friendly cookies, vanilla sugar cookies

